4. LESSON 16 - AEROTOW

Key points:
- Your responsibility for the tug pilot’s safety must remain your top priority
- Plan ahead before every launch and discuss the eventualities
Most pilots will fly an aerotow at some stage of their gliding career. For some, it is the only way they will ever launch. Whatever the reason, aerotows must be flown well. This lesson provides you with instructions for flying an aerotow. You will learn how to fly an aerotow launch step by step. You should already be able to fly reasonably straight and coordinated before learning to fly an aerotow. Generally, if you are able to make coordinated turns then you can start with aerotow lessons.

An aerotowing glider pilot is not only responsible for his/her own safety, but also for the safety of the tug pilot. Generally, an aerotow is a very safe way to launch and incidents are rare. But the fact is that the tug pilot is especially at risk if we do not follow the prescribed procedures closely. After explaining a tow from beginning to end, we will therefore describe in more detail how to deal with unusual or emergency situations. This lesson does not describe advanced aerotowing techniques; those are dealt with in separate lessons (see Lessons 4.29 and 4.30).
BEFORE TAKE-OFF
- Set trim slightly forward of neutral (nose down)
- Check whether the airfield is clear of traffic; also check wind speed and direction
- Make sure there are no obstacles in the launch area
If the glider has a nose hook we usually use that for towing - make sure the correct hook and weak link are used. Before take-off, glider and tug should be positioned pointing in the same direction in line with each other. Once you are moving, there is not much scope for changing direction; as long as the airspeed is still low and the glider still has its nosewheel or tailwheel on the ground, you will have little directional control.
The airspeed during an aerotow is often a bit higher than during a winch launch. Therefore we set the trim slightly forward of neutral (nose down). However, compared to winch launching (which takes you to 60 knots within seconds) a tug needs more time to reach this speed. This means that the wing runner will have to run farther and hold the wing for a longer period of time than during winch launching.
SIGNALLING
The club’s standard operating procedures for aerotow launches reflect local conditions. Your instructor will familiarize you with these procedures.
INITIAL ACCELERATION
- Keep the wings level
- Make large control inputs
- Try to balance the glider on its main wheel as soon as possible
- If you cannot maintain directional control or keep the wings level:release immediately
Your ground roll (the distance before the glider takes off ) will be much longer compared to a winch launch. It can be difficult to keep the wings level during the first few seconds of the launch. For that reason, you should start all launches with your hand firmly gripping the release. Be prepared to use it if you cannot keep the wings level.

The flying technique you will need to use will vary according to the type of glider. If your glider has a nose wheel, the nose wheel will be on the ground before the start. With two wheels on the ground you can hardly change the direction of the glider. A glider without a nosewheel will rest on its tailwheel before the start. In both cases, you will have to try to balance the glider on its main wheel. That way, the glider will become airborne automatically.
During initial acceleration, make sure you keep the wings level using the ailerons and stay directly behind the tug using the rudder pedals. Because of the low speed, your flight controls won’t be very effective in the beginning; you will have to make quick and large control inputs to correct for deviations. The rudder will become more effective once the speed has increased.
DURING TAKE-OFF AND INITIAL CLIMB
- Do not climb higher than the tug
With most glider/tug combinations, the glider gets airborne first. As long as the tug is still on the ground, it is VITAL that you do not climb. Hold the glider close to the ground, preferably at about the height of the top of the tug’s fin (generally, gentle progressive stick forward is just fine) until the tug takes off as well.
Launching by aerotow requires a lot of concentration; you will need to keep a constant eye on the tug so you can stay directly behind it and respond immediately to changes in pitch attitude and course. Be alert for small errors and initiate smooth corrections without delay. The longer you wait before you make a correction the greater the deviation will be.

MAINTAINING POSITION
- Keep the tug on the horizon
Flying in the correct position behind a tug is a core skill that you need to master before you will move on to other parts of an aerotow launch. Acquiring this skill takes most new glider pilots at least several lessons.
The main reason is that aerotowing does not share the stability that a glider normally enjoys. After your instructor’s demonstration, when it is your turn to try, you will notice that the tug is hardly ever in the ideal position, notably because of turbulence, the rope being too slack, or the tug itself adjusting position. It is good to know that it is completely normal for a pilot to spend the entire tow correcting position.

The key is to maintain the tug in the correct position in the canopy; your instructor will show what that should look like. Many pilots find it helpful to imagine a gun sight fixed in front of them and to work to keep the tug in that. Others use a technique of lining up parts of the tug, for example the top of the fin with the top of the canopy, to ensure that their glider is in the correct position behind.
A tug usually tows at a somewhat higher airspeed than a glider would normally fly at. That is why gliders tend to ‘climb over’ the tug. You must counteract by pushing the stick forward and lowering the nose. To ease the pressure off the stick, adjust the trim forward until the control pressure disappears. Since you are now flying at a higher airspeed, the flight controls are very effective and small corrections are usually sufficient. When the tug flies through thermals or turbulent air, it climbs and sinks quickly. The glider follows a little later. Remain focused throughout the tow; quick corrections will make it a lot easier to follow the tug.

RESTORING POSITION
If the tug climbs, you climb with it, and if it sinks, you sink as well. The tug’s propeller causes a slipstream, a turbulent airflow. Your instructor will show you what effect flying in the slipstream has on the glider; it will make it harder to keep the wings level and maintain directional control. You will see that it is much calmer and much more comfortable not to fly in the wake of the tug and to adopt a slightly higher position.

Be careful not to climb too high, as this will lift the tail of the tug.
If things are going wrong, you must be able to react quickly. Usually, normal corrections are sufficient. Such corrections must be S-L-O-W, even though the controls will often be more effective and heavier than you are used to, particularly in a training glider.
Only when things are going wrong quickly is a rapid response needed. If several things are wrong with your position all at once, the best order for sorting them out is:
- Glider wings parallel to the tug wings
- Adjust the up/down position
- Adjust the lateral position (slowly!)
TURNING
- Fly the same turn radius as the tug does

If the tug starts a turn, you will have to do the same. During turns, you must fly at the same bank angle and stay within the same curve (same turn radius) as the tug. The easiest way to do this is to aim the gilder’s nose at the outer wing of the tug. If you start the turn too early or when your bank angle is too large, you will end up flying a smaller turn radius and catch up with the tug. The rope will become slack. For that reason, you should initiate your turn a little later (1).

Maintain the same bank angle and point the glider’s nose towards the outer wingtip of the tug (2).

SLACK ROPE
- If the rope is very slack, use some side-slip (or carefully apply some airbrakes)
If the rope becomes slack, wait a moment to see if it will tighten itself. A slack rope is often caused by turbulence or thermals. Small amounts of slack can be dealt with as part of the normal position keeping routine.

If the rope sags heavily (1), you can use some side-slip to tighten it again (see Lesson 4.22). If this doesn’t solve the problem sufficiently, then a (more efficient) method is to carefully use the airbrakes. Braking increases the drag, which will in turn tighten the rope. The tug’s thrust working against the glider’s drag will usually restore things quickly. Just before the rope is tightened close the airbrakes (2). If you have lost height, you will need to climb back into position.
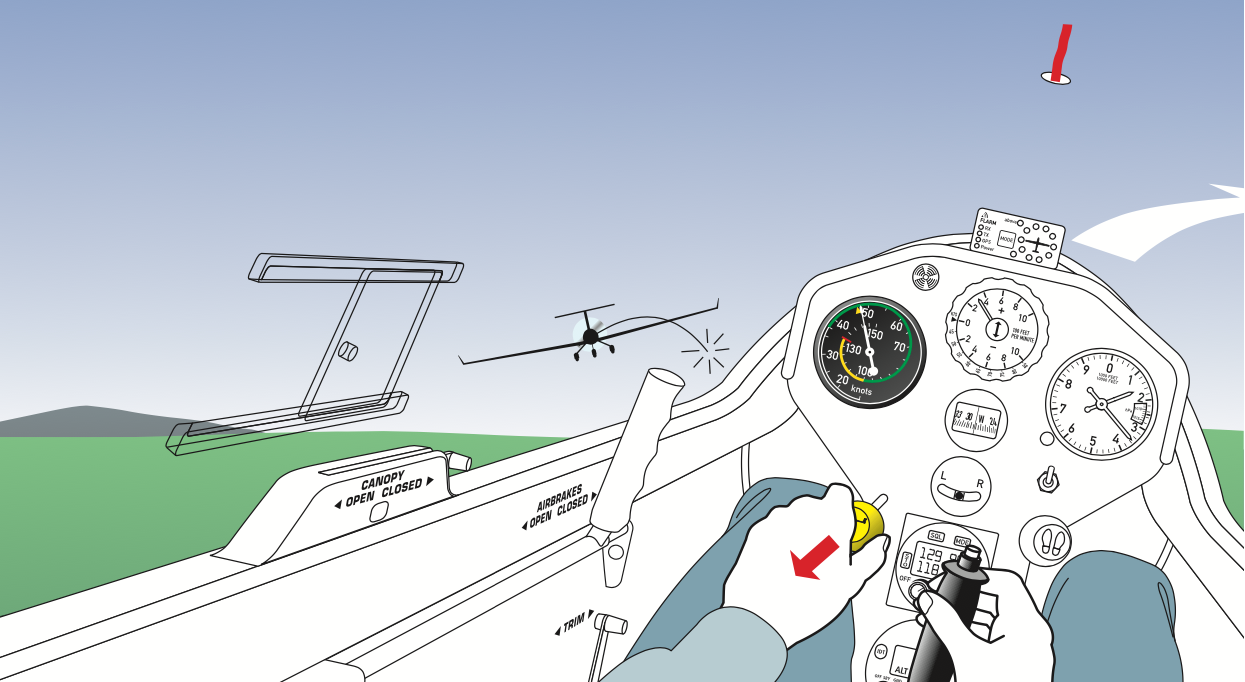
RELEASING
There are different ways to determine when to release. Sometimes the tug pilot will direct you by rocking the wing, perhaps at a pre-planned height. In that case, you must release immediately. More usually, the glider pilot simply releases when s/he chooses. Always check that the rope has actually been released and ease back on the stick after visually confirming that the tow rope has released, in order to slow down and climb. After release, the tug flies straight ahead until the tug pilot has checked whether the rope has been released.
The distance between you and the tug will increase quickly. The tug will probably start its descent back to the airfield, but different procedures may apply at your airfield; your instructor will tell you which procedure you need to follow.
SAFETY
Right up to the moment of release, it is your co-responsibility to keep the tug pilot safe. During the higher part of the launch, make sure you are holding the release knob, confirm where you are, where you want to go and what nearby aircraft you see.
Below circuit height the collision risk is very small but the tug pilot risk is high: a rapidly climbing glider, either by mistake or pilot distraction, can irretrievably pitch the tug’s nose down with fatal consequences. Stay focused on the tug and do not get distracted.
Above circuit height: only briefly glance inside the cockpit and stay focused on maintaining position throughout the launch. The tug pilot retains the responsibility of looking out for the combination of glider and tow. The glider pilot can add an extra pair of eyes, but only if this does not distract from his/her primary responsibility of maintaining the correct position behind the tug.

If the glider is allowed to climb rapidly behind the tug, it can very quickly become impossible to prevent the glider accelerating upwards in a slingshot action (rather like a winch launch), and tipping the tug over into a vertical dive. Once that has happened only height can save the situation for the tug pilot. Downward displacement of the glider to a position below the slipstream is quite acceptable, but upward displacements are much more critical.