
4. LESSON 3 - CHECKLISTS
- There is much to remember
- Humans can be fallible
- Checklists are a great help
Caution:
- Make sure the tail dolly is removed before getting into the glider
- Checklists can help a pilot be aware of necessary items; they must not become a clockwork substitute for them
There is plenty of advice available to pilots, notably the manufacturer’s Flight Manual, but very few people can be sure of remembering it all. Checklists are an essential safety measure: a way of making sure that your glider is configured appropriately each stage of flight; a way of remembering to check that things are working properly and that you haven’t forgotten anything. It is best to go through them by calling every item and response aloud, even when flying alone. Checking thoroughly and confirming key points out loud helps ensure that you will not doubt yourself later.
For example, you don’t want to ask yourself Did I lower my landing gear? at a critical stage of the landing.
Each glider has its own Flight Manual with information specific to that type and any checklists that the manufacturer recommends. It should be studied before flying a new type for the first time.

Many pilots, however, are fortunate enough to fly a range of different gliders. For these, the BGA offers generic checklists that either cover, or at least help you remember the actions needed. It is useful to learn these checklists by heart. Different countries use different generic checklists. Usually someone will have come up with a useful mnemonic (remembering technique) to memorize the items.
| Item (aloud) | Action (action) | Response (aloud) |
| Controls | Move the stick side-to-side, forward and back & all round Rudder pedals each fully forward All: full movement in correct direction with no obstructions (direction is best checked before getting in) |
Full and free in the correct direction |
| Ballast | Check if any is needed; consider water ballast. If needed: correct amount and secure. If not: none fitted (best checked before getting in) |
Ballast checked; none needed, or Ballast checked; xxKg is secure |
|
Straps |
Check that straps have been fastened and tightened Instructor, too |
Fastened |
| Instruments |
All functioning correctly; no cracks or broken glass FLARM:TX light on Altimeter: set as required Variometer: volume Radio: channel; volume; squelch Transponder: code; mode |
Set and checked |
| Flaps | Check full and free Set for take-off |
Set or none |
| Trim | Check full and free Set for take-off (usually slightly forward of neutral) |
Set |
| Brakes |
Check full and free Locked closed |
Checked, closed and locked |
| Eventualities | Mentally prepare your actions in the event of a wing drop during take off or launch failure (best briefed/ discussed/ considered before getting in) |
As briefed |
| Canopy | Check canopy closed and locked by applying upward force on the frame (not the glass or DV Panel). | Closed and locked |
PRE-CIRCUIT CHECKLIST - WULF
Before entering the circuit for landing, you should complete the following checklist.
| Item (aloud) | Action (action) | Response (aloud) |
| Water | Check ballast has been dumped | Dumped |
| Undercarriage (if any) | Check locked down | Down and locked |
| Loose articles | Check no loose articles; straps tight | Nothing loose; straps tight |
| Flaps (if any) | Check set as required | Set |
|
Item (aloud) |
Action (action) |
Response (aloud) |
| Height | Sufficient to perform your exercise and get back to your airfield | Checked |
| Airframe | Review any necessary limitations | As required |
| Straps | Tighten straps for the exercise. | Tight |
| Security | Check no loose articles | Nothing loose |
| Engine (if any) | Set engine as required | Set / Not applicable |
| Location | Check your position and that it is appropriate | Checked |
| Lookout | Turn so that you can see below and all around (but not so that gliders looking for lift join you) | All clear |
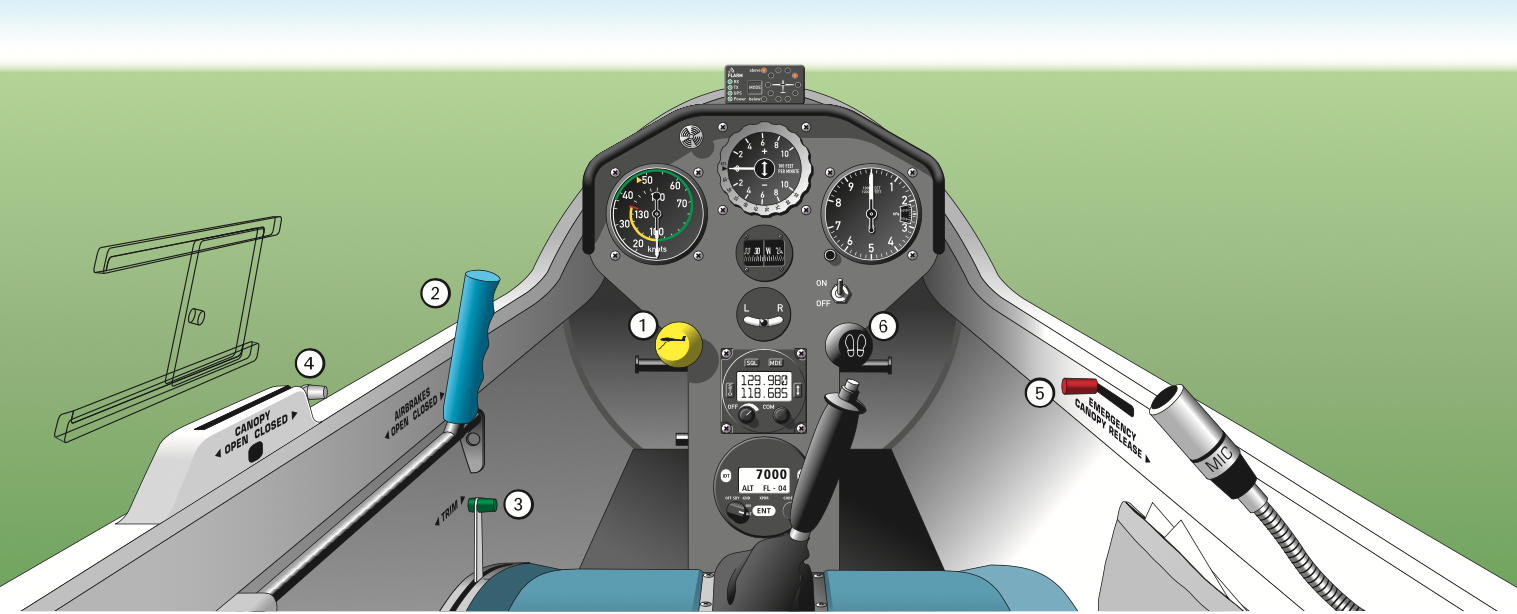
Cockpits vary – this is typical – but these colours are standard
| Lever | Colour | Operating direction |
| 1. Cable release | Yellow | Pull to release the cable or tow rope |
| 2. Air brake lever | Blue | Pull to extend the airbrakes |
| 3. Trim lever | Green |
Pull -> nose up, push -> nose down |
| 4. Canopy locking | White* | As indicated by the associated placard |
| 5. Canopy emergency jettison lever | Red | As indicated by the associated placard |
| 6. Rudder pedal adjustment lever | Black/Grey | Pull to unlock the rudder pedals |
| Flap and landing gear (not shown here) | Black/Grey |